Showing posts with label crafts. Show all posts

Friday, May 27, 2016

Grandma's Flowers Patchwork Quilt


This is my patchwork Grandma's Flowers quilt I started back in October 2015.  I was looking for something to use up my stash and something I could work on over time. 

I love sewing and machine quilting, but I just don't have the time to haul out the machine, clear a space at the table, etc.  I'm just too busy for that.  Paper piecing was the answer to my sewing dilemma!

These are all 100% hand made.  Hand cut paper, hand sewn, hand stitched 1" hexies!    To get to this point it has taken me about 5 months.  

I have a new obsession - hexies and fat quarters!

Monday, December 9, 2013

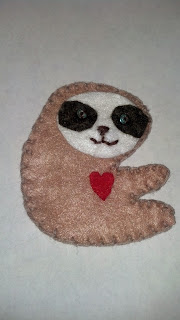
Super Cute Sloth Pin

My oldest son is into sloths.  I have no idea why, but when you have a 13 year-old, and they declare their favorite thing is an animal, you are thankful because it could be worse. For Christmas I decided to make him a little sloth guy to hang from his stocking.  Or an ornament.  Or just because.

Materials:
Felt: tan, white, dark brown and red
Embroidery Floss: dark brown & tan
Tacky Glue
2 Seed Beads (small glass beads for eyes)
Scissors
Needle

Directions:
1. Cut out sloth bodies (2), white oval for face and 2 small ovals for eyes
2. Using very small stitches, stitch dark circles onto face.  You can also use tacky glue for this step.
3. Sew beads on for eyes (sorry, I forgot to take pictures of this step!)


4. Stitch nose and mouth with embroidery floss.


5. With tan floss, stitch sloth bodies together.  I used a basic blanket stitch.


6. Using Tacky Glue, glue the face onto the sloth.


6. To add a little personal touch, add a small red heart and glue it onto the sloth.


Voila - a 15 minute cute little sloth.

You can stuff it before you add your final blanket stitches to make it more of a softie, add a little bump for a tail, make the arms into a circle shape for hanging, add a pinback to make him into a pin, add a key chain to make him into a zipper pull... there are so many possibilities!

Sunday, December 1, 2013

Salt Dough Orniments


One Christmas, we decided to make cookie ornaments from
a recipe I found from one of my mom's old recipe books.

Here's the basic recipe:

4 parts flour
1 part salt
1 part warm water
Straw
Rolling pin
Cookie cutters

1. Preheat oven to 300.
2. Mix salt & flour
3. Stir in water.  Add more 1 tbsp at a time if dough is too thick.  Stir until smooth.
4. Knead several times to get out the air and lumps
5. Roll out abut 1/8 - 1/4" thick.
6. Cut out cookies.  Using a straw, poke a hole in the ornament for the ribbon.
7. Bake on ungreased cookie sheet 60 - 90 minutes.  Ornaments should be dry and hard, but not brown.  If they start to brown, turn temp down to 250 and cover with aluminum foil.
8. When cool, finish off with paint, sealing glaze, glitter, and all the bedazzle you want.


Rolling out the dough for Christmas cookie ornaments
Some of his cut-outs, done all by himself.
A tennis racket, very festive!
Laying them down gently
Baking the ornaments

They were a little brittle and puffed up more than I hoped, but we painted them with tempera paints and they were spectacular (in the eyes of a toddler). 

Wednesday, October 30, 2013

Easy Angry Birds Card


I needed to make a birthday card, had some scrap paper and a little inspiration- and here it is!

I don't have a template because it was all done on the fly, but here are the steps I took - anyone can make this -
Angry Birds are super easy shapes!

To make Red, you need:
red, black, yellow and white paper
scissors
a pencil
a black Sharpie.
a glue stick

With my pencil, I made a circle on the red paper,  I added two bumps on top for the feathers.
I cut out the red shape and outlined it with black Sharpie

To make the white tummy, I cut out an arc, glued it to the red body, then trimmed it to match the circle.  Again, this was all outlined with black Sharpie.

The mouth is made of 2 simple triangles.  the bottom one is slightly smaller than the top, but they both meet up on one corner (see pic).


The eyes are white circles with black Sharpie dots for pupils.

The eyebrows are a v-shape.  I added a little curve to one end.


Glue together and viola!  Red!

The background is simple blue and green paper with a white cloud.  All free-handed and outlined in black.

It took me about 30 minutes to get the pieces cut and set.  With a template, it would be even faster!

Wednesday, October 16, 2013

Scrap Paper Art


Below are directions for this super easy, super cheap art project.

Materials:
several sheets of scrap paper, similar theme or color family
1-2 stretched canvases
white glue or Mod Podge
paint brush
scissors
paper cutter

Directions:
1. Start by cutting up the scrap paper.  I used a paper cutter to make straight long cuts, then used the scissors to make irregular-sized lengths.  Most of the strips were 1/4 - 1/2" wide.

2. Add a layer of Mod Podge or glue to an area of the canvas using a paint brush.  I used 4 parts glue to 1 part water to make it more workable and not as sticky.

3. Assemble pieces onto the glued area of the canvas.  Try not to make straight lines.  Have some pieces horizontal and others vertical.    There are no wrong ways!

4. Keep applying glue and paper to the canvas until the entire area was covered.  you may find yourself cutting more pieces to fit into areas - that's okay!

5. When done, apply a final coat layer over the entire picture.

6. When dry (about 24 hours) add another layer to ensure the paper is completely sealed.

And that's it!  A completed scrap paper art hanging that is completely yours!  These two took me just about 2 hours to complete.


Tuesday, October 1, 2013

Junkins


For Halloween, I borrowed the idea of making a junk pumpkin rather than carving it.  Disney Family Magazine... you are my inspiration!  Worth every penny.  

I raided Grandad's garage the week prior and our garage the Night of the Creating.  It was SUPER fun!  My kids loved pounding stuff into the pumpkins WAY more than carving and scooping out the guts.  No one got hurt and I wasn't worried someone would saw off a finger by mistake.

My youngest entered his in his school's Fall Ball Pumpkin Contest and won for his grade!!    His pumpkin was an alien/scared person pumpkin.

My oldest decided his needed a mustache and by the time he was done, we referred to him as the Mr. Pringles Pumpkin.


This is something we will definitely do again next year!

Friday, September 6, 2013

The (Not-So) Multi-Purpose Gift


Last year, As I was getting ready for work the morning of my birthday, Itchy bounces into the bedroom with a plastic grocery bag and something bobbling around in it.

"Hey mom!" (All conversations start this way)  "Here you go!"

"What is THIS?"  I might have been playing it up a little too much.  but hey, that's my job.

"Your birthday present.  I made it myself just for you!" 
Homemade presents tend to be double-edged swords. they're either beautiful, thoughtful and something I will keep forever.  Or ... something more like this.


I open my gift bag and see:  an empty oatmeal can covered in loads of bright, colorful sticky foam flowers, a cereal box? glued to the bottom, twine looped though it for a kind-of handle and a cat toy (at least it looks like a cat toy) inside.

"WOW!  I love it!  You worked really hard on this!"  I totally deserve an Academy Award for this.

"Thanks mom!  The nail scratched it a little here and that part was hard" Visions of my 7 year-old using a hammer and nail on an oatmeal can flashing through my mind.  Ohno Ohno Ohno.  Breathe... "Happy birthday mom!"

"Umm... can you explain it to me?  What is it?"

Absolutely straight faced - "I don't know."  pause ...  he looks at the gift thoughtfully - like this was the first time he had ever seen it.  "You can hang it, but the handles are too short.  Or you can put stuff into it, I guess.  I really don't know what it's for."

"You put a lot of thought into this."  At least he thought about making me something.  He is so happy to make me happy.

Proudly - "Yup" Damn, my kid is cute.  Moments like this make parenting worth it.

"It's perfect!  I love it! Thanks!" Red carpet, here I come.

He bounces out of the room all smiles and full of happiness because he made me happy.

I quickly send a pic to my BFF to share this parenting moment.  The text conversation went like this:

BFF: What is it?

Me: No clue.  There is an (old) cat toy inside.  It means a lot to him and he put love into it and that's what matters to me.

BFF: Absolutely.  I guess my brain goes, "he gave it to me, so I should use it.  Wait, how do I use it?"

Me: default answer = decoration

BFF: that makes sense

------------------------------------------------------------------------------
I have a lovely decorative container, hangy-thingy made with love and care by my darling 7 year old boy.

It's a step up from Mother's Day 2010 - I received an abstract sculpture snowman/snowball/log that was carefully? crafted out of white clay and fired with a tan glaze.  The result - a ceramic sculpture that looks like poop.  Literally.  White(ish) ceramic poop.

Wednesday, May 22, 2013

Pirate Party (3 of 3)


I found some more pictures for you Pirate-loving party planners!

At our kids Pirate Party, we had a coloring activity to occupy the little pirates.  I found these at Joanne Fabrics in their $1 section.  I had them on one of the tables with a bucket of markers for the kids to color.  Unfortunately, the kids were preoccupied with dart guns and cupcakes, so these were never done.  Now I'm saving them for a rainy day project.


The contents of the loot bags - balloons, a map/activity sheet, eye patches, rings, coins, money, tattoos, a whistle, a finger puppet and a mini telescope.  Most of this came from a party store kit, but I threw in some other goodies for good measure.


Here are the sashes I made.  They are just 42" red fabric torn on the boas and left ragged for a more authentic look.  It was long enough for all the kids - big and small.


For more pictures and ideas, see part 1 and part 2!

Tuesday, May 21, 2013

Pirate Party (2 of 3)


The loot bags by the door.  I found the bags at a local party store.

The Pirate Station.  This is where the kids first stopped when they arrived to get all "Pirate'd."  The bags were sewn by me with drawstring cording and were just big enough for some paper money and some gold coins.  Of course, they had eye patches and skull rings, too.  

The cupcake tower.  I don't think I will have another birthday cake - this was so much more fun!  I made 2 boxes of Fun da Middles - one vanilla and one chocolate.  I used dark chocolate frosting to give better contrast.  And of course, there were pirate flags on top.

The dining room table - pirate tablecloth, pirate decorations, a giant cookie and the cupcakes.

There were lots and lots of red, white and black balloons throughout the house!

For more ideas, see Pirate Party Part 1 here.

Monday, May 20, 2013

Pirate Party (1 of 3)

** Download the free pirate printables I created & used here***


For the kids birthday party in April, we decided on a Pirate theme.  
Cuz everybody loves pirates.

 The week before the party, one of the kids got a GIANT pirate play set.  It wasn't a coincidence.

The pics don't show everything.  I had to run and pick up balloons and 
Hubby was supposed to take more pics but got distracted.

 When every kid came in, they were given a checklist to find all their pirate loot.  Then I helped them into their sashes, eye patches and attached their treasure pouches.

The sashes were red cotton fabric torn into strips and left rough.
I sewed the pirate pouches out of a Jolly Roger patterned material.

The loot bags were found at my local party store and had coins, big plastic jewelry, another eye patch and other pirate-themed goodies.

 I made fun labels for the snacks.
The main dish was Chili (Rat Stew) and hot dogs (Dog Tails).  

Rather than have a cake, I made cupcakes - FunDaMiddles.  I got a cupcake tree and used black (dark chocolate) and white frosting with little pirate flags.

 Rolo candies
 Hershey Kisses
 Goldfish
 The snacks table
 Cheese puff balls

 We also had a treasure hunt.  Rather than use a map, the kids had to go clue to clue to find the final destination - the Treasure!  It was in the sandbox marked with a gigantic "X."
I buried plastic gold coins and a big bag of plastic jewels and rings.

2 dozen red, white and black balloons rounded out the decor.

All in all, I think the kids had a really good time!

For more ideas, see Pirate Party Part 2 here.

Friday, May 10, 2013

Paper Fusion Lantern Kit


For wine and chatter girls craft night I found these two lanterns and wanted to give them a try.  
They were a little on the pricey side for an unfinished craft, but the light was supposed to be extra fancy-pants and the novelty of making a lamp that would be whatever I wanted was pretty appealing.


The kit is called Paper Fusion comes with 4 unfinished square sides and a brace bar, instructions, a LED light bulb with cord and switch, translucent papers for making your own design/collage/glitter disaster, and metal screws.


I picked an assortment of metallic paint because I wanted some glittery parts.  Liquid Metal acrylic paint is one of my favorite metallic paints.  It's affordable and it looks amazing!


 First poured a glass of wine.   Then we painted all the sides and then glued the paper to the back.  


This is the view from the front.


 We lightly glued the sides together. 


Then we screwed the brace to the sides and the light base to the bottom.


2 hours and a bottle of wine later, this is the finished product.


Here is the other one we made.  Cool how close the paint matches the paper, huh?

Overall review:
It is a cool product.  The options to be able to make it your own and make it match your color schemes was awesome.  It was easy to make, the directions easy to follow.  They are made of pine/soft wood which makes them take paint easily.  One coat was all I needed.  The light bulb is super cool.  It truly does not get hot and I feel completely safe putting this light in the kids' bedrooms.

Complaints:
  • The screws were NOT easy to use.  The pre-drilled holes were not quite clean enough for the screws to easily go in.  
  • They are pricey.  For more than $30 each, they are not all that considering you need to add your own paint and paper - unless you want unfinished with translucent film.
  • The "Free $6 light" is a little misleading.  It's not free.  It's wrapped up in the price.
Compliments:
  • You can truly make it match whatever you want given the unfinished wood and zillion paper choices - or by using your own paper.
  • Directions are easy to understand.
  • Light is bright enough for thinner papers to still give a glow, but not overwhelmingly bright when using translucent film.
  • The light is LED - less energy used to use it!  Yay!
  • Light truly does not get hot.  Making me feel completely safe putting this in a kid's room and not worry about the paper smoldering.


Thursday, May 2, 2013

Tinted Mason Jars


My bestie was having a baby shower and I was in charge of decorations.  It was going to be outside and we were using all sorts of bright colors as the theme.  (No, they're not finding out.)

I wanted to do something fun and was in a Mason Jar kick.  So I looked up how to tint mason jars.  The ones I saw online were BEAUTIFUL!  Mod Podge and food coloring.


 I followed the directions carefully.  Mix food coloring with a little water.  Add to Mod Podge (glossy).  Spin and cover entire inside of jar.  Pour out excess.  Bake upside down in 200 degree oven for about 1/2 an hour.  Check.  If not clear, back another 20 minutes and keep checking.


Well, mine never got really clear.  They were more streaky and gloppy.   
 I ran out of Mod Podge and looked around for something else.  Something clear.  Something that would mix with water and dried hard. I dug through my art boxes, drawers, storage totes, closets (it's embarrassing, I might have an art/craft supply problem...) Liquitex to the rescue!  
I found a bottle of Pouring Medium and decided to give it a try.
NOTE: Liquitex Pouring Medium is NOT food-safe.  Do not eat/drink from the tinted jars!


Once again, I mixed the food coloring with a little water to break up the pigments.  Then I mixed some pouring medium in with it.  I kept it dark because I knew it would dry lighter.  I tilted the jars to totally coat the insides, then turned it upside down on a paper bag (to catch the drippings)  After about 1/2 an hour, I did a second coat in the same way.  I left the jars upside down for another 1/2 an hour or so, moving them once and a while to make sure they were not going to stick to the paper bag.


I then moved them to wax paper (still upside down) and let them dry for the night.

The next morning, I turned them right-side up and let them finish drying for a couple days.  Just to be safe.

(Worth noting again) NOTE: Liquitex Pouring Medium is NOT food-safe.  
Do not eat/drink from the tinted jars!


The finished jars as centerpieces.  I crinkled some decorative cellophane and put the rings back on with a cut artificial flower. They turned our lovely and with the cellophane inside, you could hardly see the streaks & glops from the green Mod Podge batch.